Complete Setup Guide
This guide provides detailed explanations of all NeatQueue configuration options. If you haven't created your first queue yet, start with the Quick Start Guide.
For a faster experience, run /setup for an interactive guided setup, or see the Quick Start Guide for a 5-minute setup.
Understanding Queue Types
NeatQueue supports 4 types of queues:
- PUGs/Normal Individual Queue: The default setup. Players join individually to get put into a match when the queue is filled.
- Matchmaking: Players join the queue, and once there are enough players within their MMR range, a match is created.
- Full Team vs Full Team: Captains join the queue and pull in the entire team. No team setup is required.
- Select Team On Join: The queue has join buttons for each team, no team setup is required.
This guide focuses on the default PUGs queue type, which is the most common setup.
Basic Queue Configuration
Initial Queue Creation
To create a basic queue with default settings, use /startqueue.
You'll be prompted for three required options:
- Name - The name of your queue (e.g., "Ranked 5v5")
- Team size - Number of players per team (e.g., 5)
- Number of teams - How many teams compete (usually 2)
![]()
Viewing Your Configuration
To see all current queue settings:
/info
This displays your configuration across multiple pages, including team selection, MMR settings, maps, and more.
Modifying Basic Settings
If you need to adjust your queue after creation:
/queuename- Change the queue name/teamsize- Adjust team size/numberofteams- Change number of teams
Be aware of how Stats are handled before changing the queue's name. Stats are tied to queue names by default. See the Leaderboard and Stats guide for more details.
Queue Entry Methods
Button-Based Entry (Default)
By default, players join a queue by clicking the Join Queue button on the queue embed.
Voice Channel Entry
You can also configure players to join by entering a voice channel:
/queueentry methods- Set the method to Voice Channel/queueentry channel set- Specify which voice channel to use
Manual Player Management
Staff can manually manage queue participants:
/player add- Force a player to join the queue/player remove- Force a player to leave the queue
Explore /queueentry commands for additional entry configuration options.
Ready-Up Configuration
The queue's voice channel is a temporary voice channel created for match setup. By default, it's formatted as: Queue#1
By default, when the queue size is met and a match is created, all players must join the Queue VC to proceed with the voting section. You can customize this behavior.
Ready-Up Modes
Use /readyup mode to change how players enter the queue voice channel:
- Ready Up Button - Players click a button instead of joining voice
- Join Lobby Voice Channel (Default) - Players must manually join the queue VC
- Disabled - Skip the ready-up requirement entirely
Lobby Channel
Set a lobby channel with /lobbychannel set. When players are in this channel and a match starts, they'll be automatically moved to the queue voice channel.
You can modify the ready-up timeout with /lobbychannel timer (only works if readyup is not disabled).
Voice Channel Restrictions
By default, there are user limits on queue and team voice channels. Disable these restrictions with /channel restrictions.
Voting Setup
Once all players have joined the queue's voice channel, a voting section begins (this can be automated).
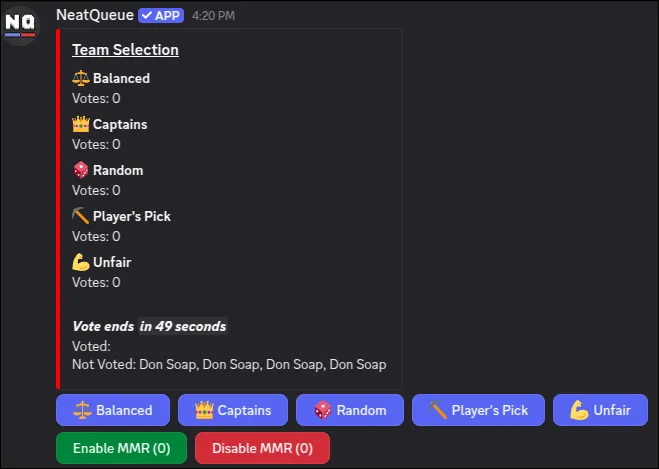
Team Selection Methods
Choose from 5 modes to select teams:
- Balanced: Makes teams as fair as possible using MMR/stats
- Captains: Captains take turns picking players
- Random: Creates random teams
- Player's pick: Players choose which team they want
- Unfair: Creates intentionally unbalanced teams
Configuring Team Selection
Use /teamselection set to choose which modes to display. Select the modes you want to keep and show from the dropdown. If only one mode is selected, it will be automatically chosen (skipping the vote).
The Enable/Disable MMR buttons can be hidden using /mmr change allow_disable.
Captains Configuration
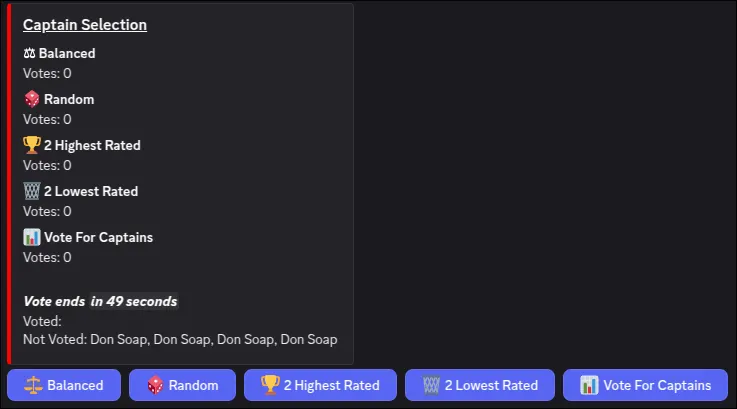
When using Captains mode, there's an additional voting section for captain selection. Configure this with /captains selection (works similar to teamselection).
Explore the /captains command group for extensive captain customization options.
Team Reshuffle

After team selection (e.g., Random mode), players vote to confirm the teams. Select YES if the teams are acceptable, or NO to regenerate them.
Disable this confirmation with /teamselection reshuffle. Similar options exist for:
/captains reshuffle/map reshuffle/gamemode reshuffle
Winner Selection
After voting completes and teams are assigned, players are split into team voice channels. A voting embed appears in the queue text channel.

When the game finishes, players return to Discord and vote for the winner. After voting concludes:
- Channels are deleted
- Players return to the lobby channel (if configured)
- Results are posted to the results channel
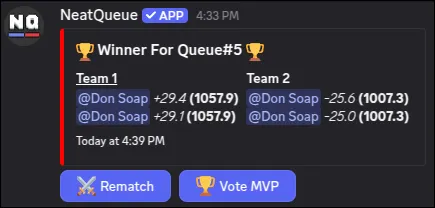
Results Configuration
/resultschannel- Change where results are posted/mvp toggle- Enable/disable MVP voting/rematches- Enable/disable rematch functionality
Essential Configuration
Now that you understand the basic flow, let's configure the most important settings.
Setting Up Results Channel
Choose where match results are posted:
/resultschannel
Results include:
- Winning team
- MVP (if enabled)
- Individual player stats
- MMR changes
Additional Result Options
Configure result-related features:
/mvp toggle- Enable/disable MVP voting/rematches- Enable/disable rematch functionality
Setting Up Leaderboard
Create a dedicated leaderboard channel to track player rankings:
- Create a new channel (e.g.,
#leaderboard) - In that channel, run:
/link - Select your queue channel
- Run:
/leaderboard
Leaderboard access requires voting on top.gg. If stats do not unlock, type @NeatQueue i voted in your server.
See the Leaderboard and Stats guide for comprehensive stats configuration.
Configuring MMR System
Set how much MMR players gain or lose per match:
/mmr change set amount:25
This makes wins/losses change MMR by approximately ±25 points. The actual amount varies based on:
- Team MMR difference
- Individual performance
- Whether MMR is enabled for the match
You can configure additional MMR settings:
/mmr change allow_disable- Allow players to disable MMR in voting/mmr starting- Set starting MMR for new players/mmr minand/mmr max- Set MMR boundaries
See the MMR and Ranks guide for advanced MMR configuration.
Adding Maps (Optional)
If your game uses maps, you can add them to your queue:
/map add name:"Dust2"
/map add name:"Mirage"
/map add name:"Inferno"
Then configure how maps are selected:
/map selection method:voting
Available map selection methods:
- Voting - Players vote on the map
- Random - Map is chosen randomly
- Disabled - No map selection
See the Maps and Modes guide for advanced map configuration.
Configuration Management
Saving Your Configuration
Once you're happy with your setup, save it for future use:
/config save name:"My Ranked Setup"
Benefits of saving configurations:
- ✓ Quickly restore settings if you make mistakes
- ✓ Apply the same configuration to multiple queues
- ✓ Share configurations across different servers
- ✓ Experiment with new settings safely
Loading Configurations
View your saved configurations:
/config list
Load a configuration by its ID:
/config load [config_id]
You can see your 10 most recent configurations with /config list.
- Save a working configuration before experimenting
- Use descriptive names (e.g., "Ranked 5v5 Balanced" instead of "Config 1")
- Create separate configurations for different queue types
- Save configurations after major changes
Testing Your Queue
Before opening your queue to players, test it thoroughly:
Enable Test Mode
/test
Test mode features:
- ✓ Reduced timers for faster testing
- ✓ Ability to fill queue solo
- ✓ Stats are not affected
- ✓ All features work normally
Testing Checklist
Verify the following works correctly:
-
Queue Joining
- Click "Join Queue" button
- Leave queue works
- Queue fills at correct player count
-
Ready-Up Phase
- Players can join queue voice channel (or ready up button)
- Timeout works correctly
- AFK detection works
-
Voting Phase
- Team selection methods appear correctly
- Voting completes and teams are created
- Captain selection works (if using Captains mode)
- Map voting works (if configured)
-
Match Phase
- Team voice channels are created
- Players are moved correctly
- Voice channel restrictions work (if configured)
-
Results Phase
- Winner voting works
- Results are posted to correct channel
- Stats are recorded (if not in test mode)
- Channels are deleted
- Players return to lobby (if configured)
Disable Test Mode
Once testing is complete, run the command again to toggle off test mode:
/test
Advanced Features
Once you have your basic queue running, unlock these powerful advanced features.
Staff Channel
Set up a dedicated staff channel for better queue management:
/staffchannel set
Benefits:
- View complete queue history
- Easier queue modifications and management
- Staff-only controls and notifications
- Better oversight of active matches
Only users with staff roles or Manage Channels permission can access staff features.
Staff Management
Grant users staff permissions to help manage queues:
/staffrole add [role]
Staff roles can:
- Modify queue settings
- Force start/end matches
- Manage players in queue
- Access staff channel
For more granular control, allow staff to use specific commands:
/staffrole command allow [command_name] [role]
Example:
- Allow Moderators to use
/player addand/player remove - Allow Admins to use
/configcommands - Keep
/managestats resetrestricted to server owner
Custom Voting Menus
Add your own custom voting sections beyond the default team/map selections:
/votingmenu add
Use cases:
- Server selection - Vote on which game server to use
- Rule variants - Choose special rules or modifiers
- Time limits - Vote on match duration
- Custom modifiers - Enable/disable specific features
Configure:
- Vote title/question
- Available options
- Vote duration
- Required percentage to pass
Explore additional options with /votingmenu to edit, remove, reorder, or set defaults.
Leaderboard Position Roles
Automatically give roles to top-performing players:
/autoroles leaderboardposition set
Example configurations:
- Top 1 player → "Champion" role
- Top 3 players → "Podium" role
- Top 10 players → "Elite" role
- Top 25 players → "Veteran" role
Benefits:
- Recognize top performers
- Create exclusive channels for high-ranked players
- Gamify the leaderboard experience
- Motivate competitive improvement
Hero System
Add character/hero selection to your queues for games with multiple playable characters:
/hero add [hero_name]
Configure with /hero commands:
- Hero pools and restrictions
- Banning phase
- Pick order
- Duplicate prevention
- Role-based selection
Perfect for:
- MOBAs - League of Legends, Dota 2, Smite
- Hero Shooters - Overwatch, Apex Legends, Valorant
- Fighting Games - Character selection systems
- RPGs - Class or character selection
Lobby Details Customization
Customize the information displayed when a match starts using dynamic substitutions:
/lobbydetails set [details_text]
Available substitutions:
Player substitutions:
HOST- Randomly select a player name from the match
Match information:
QUEUENUM- The unique queue/match numberRANDOMTEAM- A randomly selected team name
Random selection:
RANDOM[Option1,Option2,...]- Randomly pick from options- Example:
RANDOM[Heads,Tails]→ Heads or Tails
Password generation:
PASSWORD#T- Generate random string#= length of passwordT= type of characters
Password types:
L- Lowercase letters onlyU- Uppercase letters onlyN- Numbers onlyC- Lowercase and uppercase lettersA- Lowercase, uppercase, and numbers
Examples:
Basic server details:
Host: HOST
Lobby Name: QUEUENUM
Map: RANDOM[Dust2,Mirage,Inferno]
With password:
Host: HOST
Lobby Name: QUEUENUM
Password: PASSWORD8A
Result: Host: @NeatZ, Lobby Name: 12345, Password: D83mA76x
Coin flip:
**Match #QUEUENUM**
First pick goes to: RANDOM[Team A,Team B]
Markdown formatting:
You can enhance visuals using Markdown: bold (**text**), italic (*text*), code (`text`), and links.
Premium Customization
With NeatQueue Premium, unlock additional customization options:
Visual customization:
- Custom images - Add thumbnails and banners to queue embeds
- Embed colors - Customize the color scheme
- Team icons - Add logos for teams
- Custom emojis - Use your server's custom emojis

Premium queue with custom branding, colors, and images
Advanced Best Practices
- Start simple - Add advanced features gradually after your basic queue works
- Test everything - Use
/testmode to verify new features - Get feedback - Ask your community what features they want
- Document settings - Keep notes on your configurations
- Combine features - Create powerful setups by combining multiple features
Combine features for powerful setups! For example:
- Hero system + Map voting + Custom server selection
- Premium branding + Rank roles + Staff channel
- Lobby details with passwords + Auto-move to voice + Results channel
Next Steps
Congratulations! You've completed the comprehensive setup. Explore these guides to unlock more features:
- Leaderboard and Stats - Comprehensive stats and rankings
- MMR and Ranks - Advanced ranking systems
- Maps and Modes - Add variety to matches
- Troubleshooting - Fix common issues
Command Reference
Here are all the commands mentioned in this guide:
Basic Setup Commands
| Command | Purpose |
|---|---|
/startqueue | Create a new queue |
/info | View queue configuration |
/queuename | Change queue name |
/teamsize | Change team size |
/numberofteams | Change number of teams |
/queueentry methods | Configure queue entry method |
/queueentry channel set | Set queue entry voice channel |
/player add/remove | Manually manage players |
Ready-Up & Voting Commands
| Command | Purpose |
|---|---|
/readyup mode | Configure ready-up mode |
/lobbychannel set | Set lobby voice channel |
/lobbychannel timer | Configure ready-up timeout |
/channel restrictions | Toggle voice channel user limits |
/teamselection set | Choose team selection modes |
/teamselection reshuffle | Toggle team reshuffle confirmation |
/captains selection | Configure captain selection modes |
/captains reshuffle | Toggle captain reshuffle confirmation |
Results & Stats Commands
| Command | Purpose |
|---|---|
/resultschannel | Set results channel |
/mvp toggle | Enable/disable MVP voting |
/rematches | Enable/disable rematches |
/leaderboard | Display leaderboard |
/mmr change set | Configure MMR gain/loss |
/mmr change allow_disable | Allow disabling MMR in voting |
Map & Game Mode Commands
| Command | Purpose |
|---|---|
/map add | Add a map |
/map selection | Configure map selection method |
/map reshuffle | Toggle map reshuffle confirmation |
/gamemode reshuffle | Toggle gamemode reshuffle confirmation |
Configuration Management Commands
| Command | Purpose |
|---|---|
/config save | Save configuration |
/config load | Load configuration |
/config list | List saved configurations |
/test | Toggle test mode |
Advanced Feature Commands
| Command | Purpose |
|---|---|
/staffchannel set | Set up staff channel |
/staffrole add | Add staff role |
/staffrole command allow | Allow staff to use specific commands |
/votingmenu add | Create custom voting menu |
/autoroles leaderboardposition set | Set leaderboard position roles |
/hero add | Add hero/character |
/lobbydetails set | Customize lobby details with substitutions |
- 📖 Return to Quick Start for a simpler overview
- 🔧 Check Troubleshooting for common issues
- 💬 Join the support server (link in bot profile)
- 📚 Browse all commands in the reference